Google Cloud officially transitioned its exam delivery platform from Kryterion/Webassessor to Pearson VUE / OnVUE. So I thought I'll familiarize new exam takers to the process. If you'd taken the certification exam a while back, the experience is pretty much the same.
The Updated Guide to Taking a Google Cloud Exam with Pearson VUE (OnVUE)
* The remote proctoring experience use Pearson's OnVUE platform.
* The login identity seems to have recently changed to your Google Skills account from the earlier CertMetrics account. My guess is that this is to integrate the new approach where certain certifications (ACE, CDL, PCA, PDE) can be kept active by completing some skill badges rather than re-taking the exam. See more here: New ways to keep Google Cloud certifications current and boost your career
1. How to Register via Pearson VUE
Registrations flow through Google's candidate management portal into Pearson VUE:
-
Sign in to CertMetrics (CM Connect):
I'd recommend that you find your exam from the list of certifications on Google Cloud Certifications and click the Register for exam button. That will direct you to the CertMetrics login portal .
- Sign in using your Google Skills account or your registered email and password.
- If registering for the first time, ensure your legal First and Last Name exactly match the government photo ID you will present on exam day.
-
Launch Exam Scheduling:
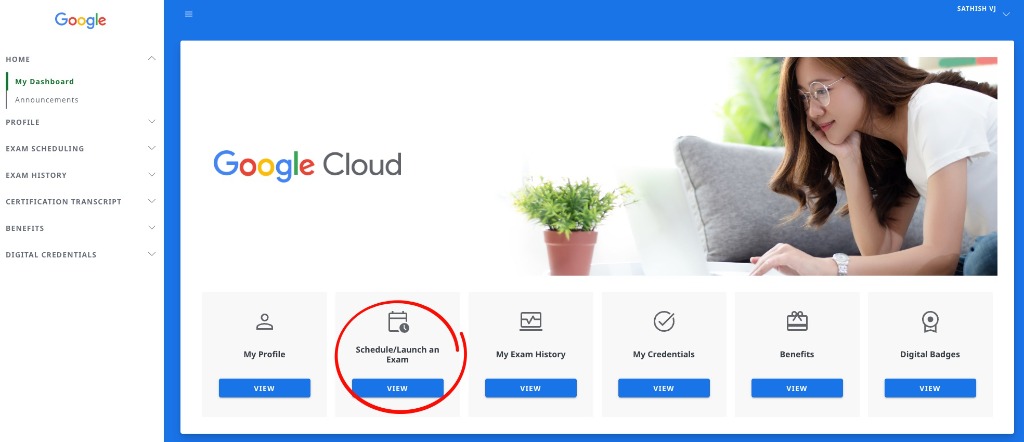
From your CertMetrics Dashboard home page, click on the Schedule/Launch an Exam card (or navigate via the left menu under EXAM SCHEDULING).
-
Select Your Exam:
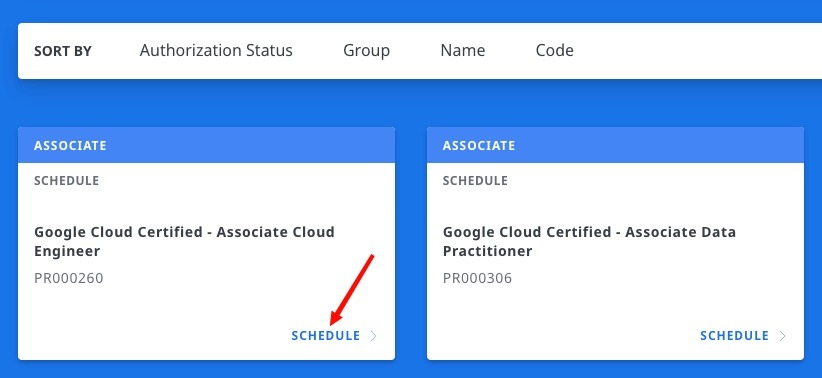
Locate the certification exam you wish to take from the catalog list (e.g., Google Cloud Certified - Associate Cloud Engineer) and click the SCHEDULE > link on the card.
-
Choose Delivery Option (Online with OnVUE):
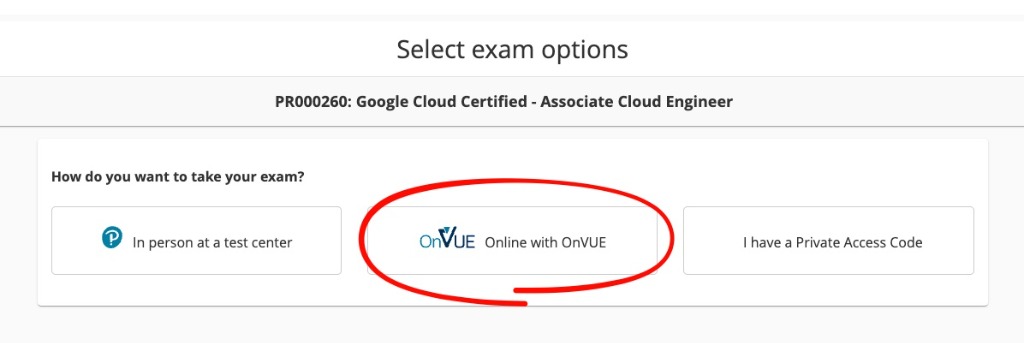
On the exam options screen, select Online with OnVUE to take the proctored test remotely from home or office.
-
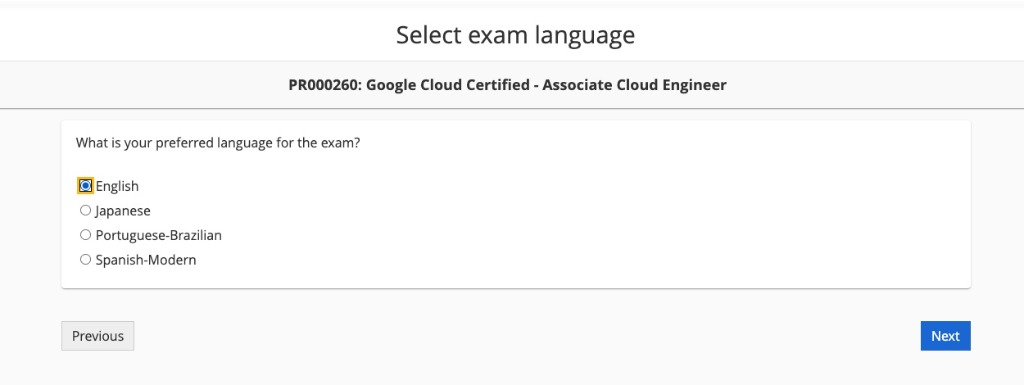
Select Exam Language:
Choose your preferred language (e.g., English, Japanese, Portuguese-Brazilian, or Spanish-Modern) and click Next.
-
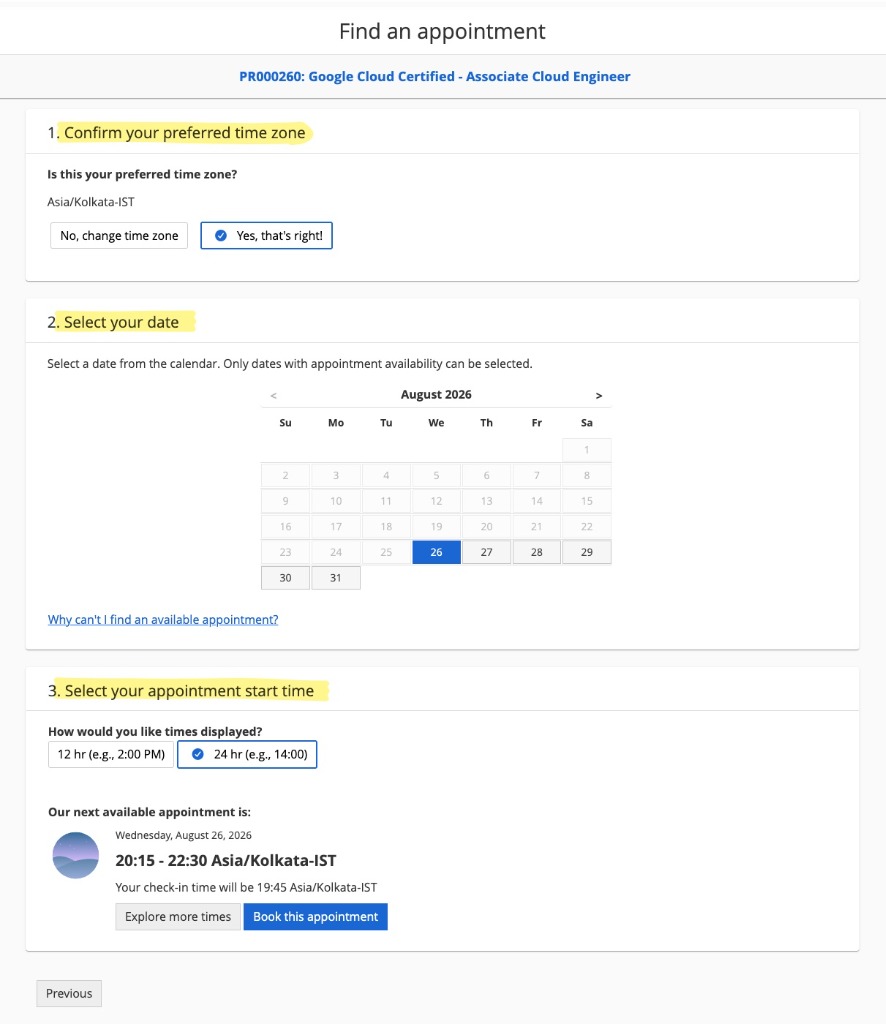
Find an Appointment (Time Zone, Date & Time Slot):
On the Find an appointment page:
- 1. Confirm preferred time zone: Verify that your local timezone is selected correctly.
- 2. Select your date: Choose an available date from the calendar.
- 3. Select appointment start time: Choose 12-hour or 24-hour display format, pick a convenient time slot, and click Book this appointment.
-
Review & Complete Payment:
- Run the preliminary system test on the computer and network you plan to use on exam day.
- Review your exam summary details, apply any Google Cloud exam voucher/promo code, and complete checkout. You will receive an immediate confirmation email from Pearson VUE.
2. Setting Up Your Environment & What to Keep Handy
Pearson’s OnVUE remote proctoring uses strict automated checks and live proctor monitoring.
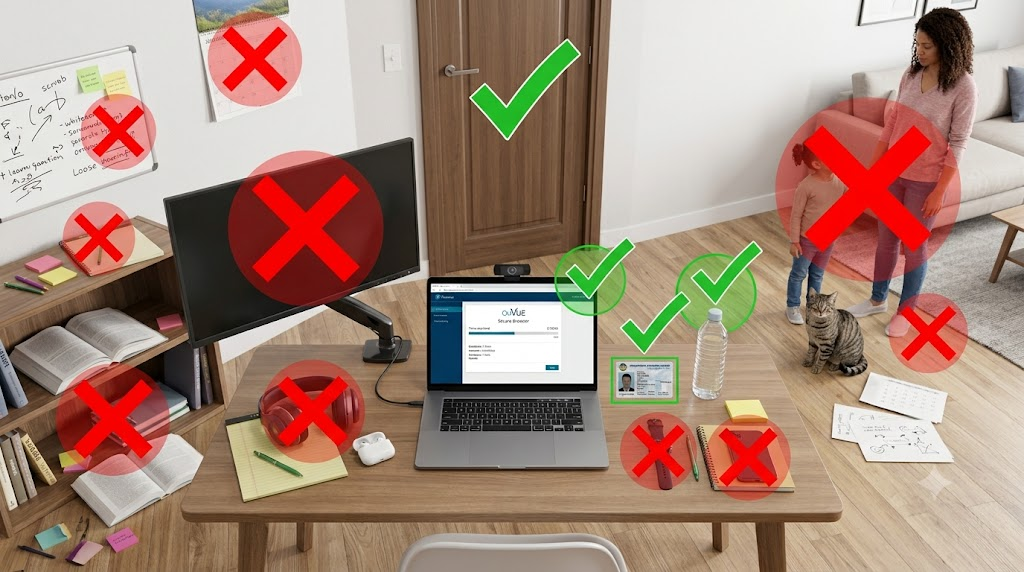
Workspace & Room Guidelines
- Private, Enclosed Space: Test in a closed-door room. No other people or pets are permitted to enter or talk during the exam.
- Clean Desk Policy: The entire desk area must be completely clear. Remove all paper, pens, sticky notes, books, extra keyboards, and monitors.
- Single Screen Only: Disconnect all external monitors if using a laptop; secondary displays are prohibited.
- Lighting: Ensure bright, even lighting from the front or ceiling so the camera can see your entire face without lens glare or deep shadows.
- Audio & Headsets: No headphones, AirPods, or earbuds are permitted. You must use your computer’s internal or basic external speakers and microphone.
- Watches & Wearables: Smartwatches and fitness trackers must be removed.
What to Keep Handy
- Government-Issued Photo ID: Physical, unexpired passport, driver’s license, or national ID card.
- Smartphone: Needed initially for the mobile check-in process (taking photos of your workspace and ID). Once check-in is complete, place the phone across the room out of arm’s reach.
- Water: A clear glass or transparent bottle with labels removed is permitted on the desk.
Your smartphone is required initially during the 30-minute pre-exam check-in to scan the OnVUE QR code, snap a selfie, upload ID photos, and take 4 workspace perimeter photos. However, as soon as mobile check-in verification is finished, you must place the phone across the room out of arm's reach and on silent mode. Touching or looking at your phone during the active exam can lead to immediate revocation.
My Experience was it's Not That Very Stringent
The list seems pretty stringent. However, my experience has not been that much of a hassle. I took an exam in my living room which had a TV to one side. There were book shelves around the room. imho, those are kinda fine as long as you are not seen looking towards them frequently. The proctor will caution you if they find you looking away too often and can potentially cancel your exam without a refund.
During some of the beta exams that used to go on for 4 hours, I would feel unfocused and somewhat woozy towards the end - a four-hour exam is usually a five-hour exam given the initial getting ready and setup. So I had some dry fruits - almonds, raisins, cashews - for a snack, and the invigilator didn't say anything.
A few times I was stopped during my exam:
- when I was air-drawing architecture - i.e. explaining to myself the system architecture, moving my hands around a lot. Who are you gesturing to?
- when I was mumbling/whispering the question to my self. What are you communicating with?
- when I kept looking to one side repeatedly. Are you looking at somebody or something for answers?
In general, keep electronics out, single screen, no pen and paper, and don't do suspicious things.
3. Complete the System Check in Advance
Do not wait until the day of the exam to find out if your setup works. Failure to meet the minimum requirements on exam day can result in immediate exam cancellation and forfeiture of your exam fee.
Issues I've seen: the company laptop doesn't allow you to install anything, incompatible system OS configurations, VPN causing some issues. Deal with all of this well in advance. Your anxiety is going to be very high if you find out all of this on test day. Even if you finally get it to work, you have now lost your focus and calm. So, deal with it early. Borrow a friend's or spouse's laptop if necessary or change exam to in-person at a test center (I don't know for sure if they allow it, but you can try and let me know too).
Head over to the official Pearson VUE Google Cloud OnVUE page and click the Run system test button:
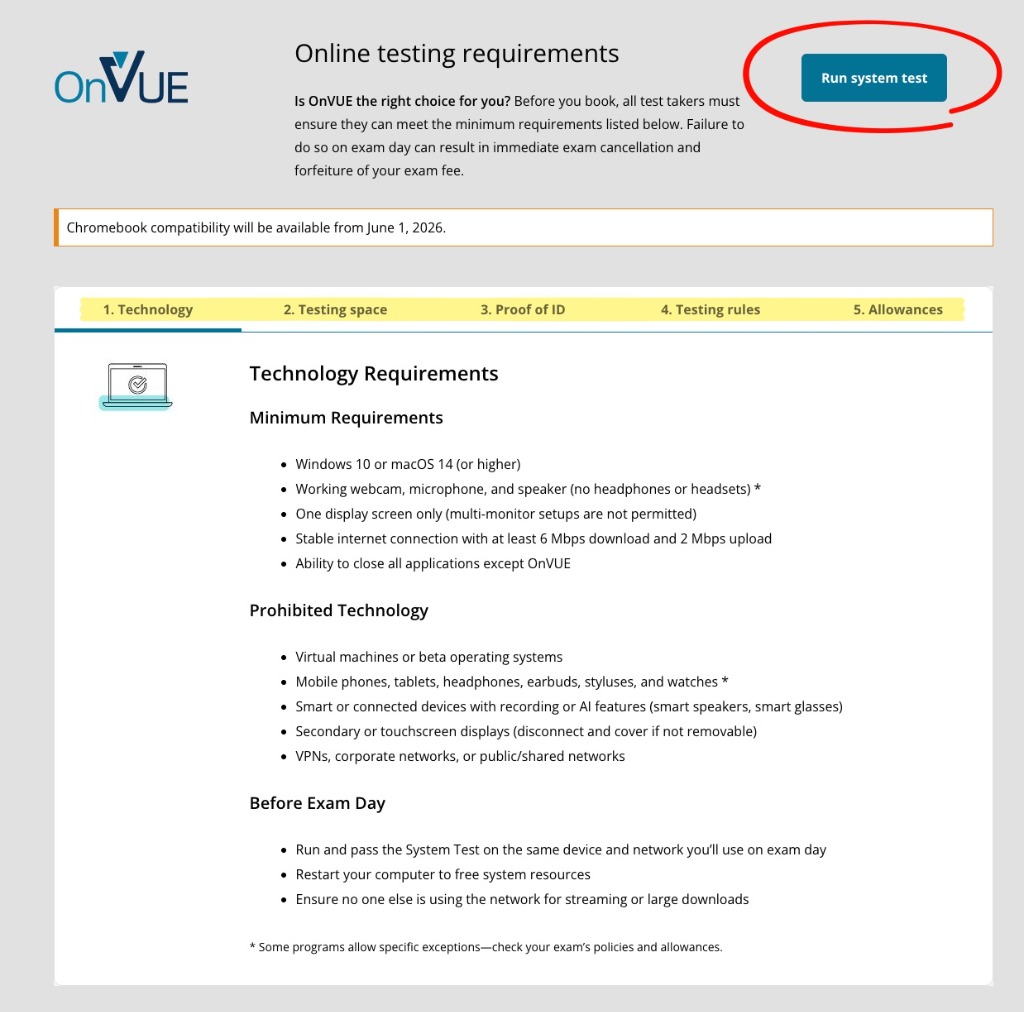
Skim through all the instructions. Mostly vanilla, but it does help to get a sense of what is expected from you.
4. Getting Ready Just Before the Exam (30 Minutes Prior)
Important thing to remember before you get your blood pressure up: the exam need not necessarily start exactly at the scheduled time. The setup takes some time and then you have to wait for a proctor/invigilator. So, once your setup has started and it is taking a little time, it should be ok - remain calm.
-
Initiate Check-In (30 Minutes Before):
- Close all other apps and background apps that are not required. You'll need a browser tab/window.
- Log into CertMetrics/Pearson VUE.
- Click Schedule/Launch an Exam.
- Find your booked exam and launch it. Note that you will be able to start that only 30 minutes (or is it 15 minutes?) before your scheduled start time.
- You should have installed OnVue already - OnVue will now open.
-
Mobile Self-Check-in:
Follow instructions to do these steps on your smartphone:
- Scan the on-screen QR code.
- Take a headshot selfie.
- Take clear photos of the front and back of your photo ID.
- Take four photos of your workspace (Front, Back, Left, Right).
- Place the phone away from your desk as instructed.
Now, you'll likely twiddle your thumbs for about 5 to 10 minutes until a proctor shows up. Chat/Talk with them, show them your room, show your hands, show your workspace and you're good to go. I can't quite remember now whether they asked me to show all around the room with my laptop camera - under the table, to the left, to the right, the ceiling. They used to do that earlier, at least.
Once the proctor feels everything is ok, they'll unlock the exam and you can start. You'll start with agreeing to some terms and conditions. Once all that is done, your time starts and the first question shows up.
5. Taking the Exam: Interface & Navigation Tactics
Google Cloud certification exams typically consist of 50–60 questions with a 120-minute (2-hour) limit (Foundational exams like Cloud Digital Leader are 90 minutes).
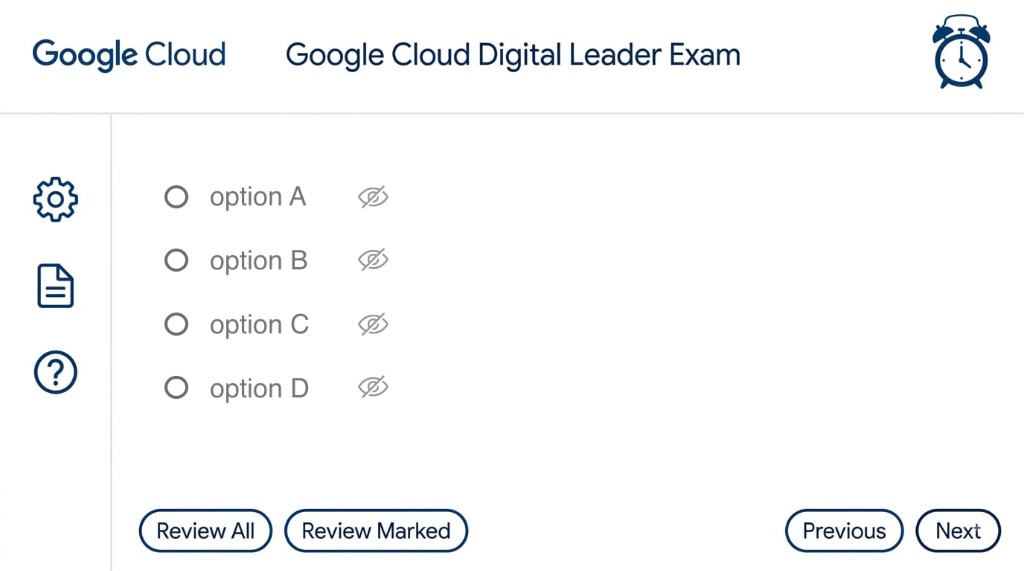
Choosing Options
- Single Choice (Radio Button): Only one answer is valid.
- Multiple Choice (Checkbox): Prompts specify how many answers to pick (e.g., "Select TWO" or "Select THREE"). The interface will alert you if you select fewer than required.
"Hide/Eliminate" Option Feature
- The eye icon allows you to "eliminate" an option, which makes that option a lighter color. (On the actual exam the icon is some text with a strikethrough, but to inform you here, this eye icon is visually better.)
- "Eliminated" options can be clicked again to show them in normal font again.
- I've always recommended that you approach the questions through a process of elimination, especially the longer, more complex, and convoluted ones. So, use this well.
- The Settings icon in the left navbar has an option to "Show/Hide Eliminate icon".
Icons in the Left Navbar
-
Settings (Gear Icon):
- Font Size: My screen had high resolution and I increased the font size to ~150%.
- Theme: Light, dark, or high contrast.
- Show Eliminate Icon: Toggle option elimination visibility.
-
File / Notes (Document Icon):
This allows you to keep notes on a per-question basis. In certain exams where some calculations took time, I had to come back to it in review and redo all the calculations again. And, as you know, you are not allowed pen and paper. So, if you feel a question is taking you too long, put down any thoughts and notes about the question you have quickly, which could help you when you review later.
Note: If you feel you're running out of time, make a choice of a reasonable option and mark the question for review. Just in case you don't have time to come back to it later, at least you've given yourself a chance on the question.
- Help (Question Mark Icon): A small reference table with built-in help and interface guides.
Using the "Mark for Review" Feature
- Every question features a "Mark for Review" button at the bottom of the screen.
- Strategy: If a question is lengthy or ambiguous, eliminate the obviously wrong choices, select your best tentative guess, and check Mark for Review. Never leave a question unselected, as there is no penalty for guessing.
Navigating the Review Screen
- At the end of the question set you can review only the Marked for Review questions or you can Review All.
- In Review Marked mode, clicking Next takes you to the next Marked for Review question.
- Strategy: Do not mark too many questions for review, or else you'll be overwhelmed (and more than that, if you're like me, bored) at the end of the exam. Then you won't focus on the few that really need your attention again.
Strict OnVUE In-Exam Rules
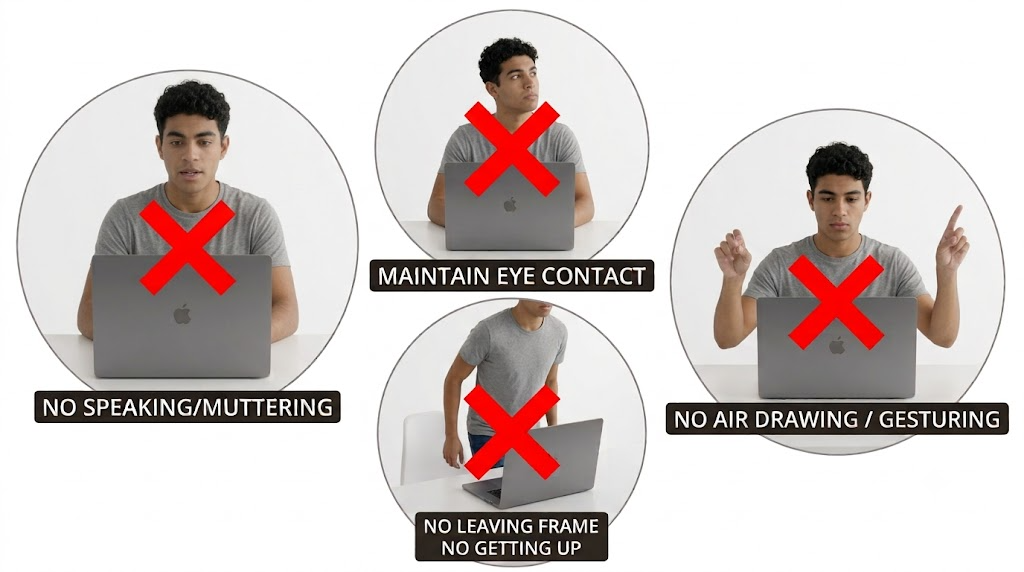
- No Speaking / Muttering: Do not read questions out loud or cover your mouth with your hands.
- Maintain Eye Contact: Avoid looking away from the screen or turning your head repeatedly for prolonged periods.
- No Leaving Frame / No Getting Up: Do not leave the camera view or stand up for any reason unless an official scheduled break is built into the exam format.
- No Air Drawing / Gesturing: Avoid expressive hand gesturing or visualizing architecture in the air, as proctors may suspect you are communicating with someone off-camera.
6. Submission and Scores
-
Complete your review and click Submit / End Exam.
- If time runs out and you do not explicitly click Submit/End, your current responses are automatically recorded.
- An on-screen Provisional Result (Pass or Fail) will display immediately.
- Close the OnVUE application properly before handling your smartphone or taking photos of your screen.
-
Official confirmation of Pass/Fail will arrive in your registered email address.
Your Credly digital badge will post to your CertMetrics account and to
your Credly account
within a few business days once Google completes standard post-exam security validation.
- Beta exams might take weeks before you get an update.
- In certain cases, I'm hearing of results being provided within hours, but that doesn't seem to be the norm. A few days is the norm.
AwesomeGCP.com Learning
The approach taken is a question-led learning approach: you explore realistic project scenarios where you need to make decisions or take actions to achieve business goals within specific constraints. Instead of passive learning, you are challenged to think and work through the options. This impresses concepts and knowledge more deeply, and equips you with the ability to do well at your work or ace the exam!
Additional Resources
- Pearson VUE Google Cloud Testing & System Test: Pearson VUE OnVUE for Google Cloud
- Google Cloud Certifications Portal: Google Cloud Certification Overview & Scheduling
- CertMetrics Candidate Management (CM Connect): Google Cloud CertMetrics Portal
- AwesomeGCP Video Playlists & Guides: AwesomeGCP YouTube Channel
- AwesomeGCP Certification Repository: AwesomeGCP Certifications GitHub Repo